How to Clean, Refresh, and Seal Your Grout (Easily and Cheaply!)

It’s easier than you think to clean your grout. With this tutorial, you can not only clean your grout but seal it to prevent stains too!
Next month will mark one year since we moved into our new construction home. When we were in the building process and went to the flooring supplier to pick our finishes I distinctly remember them telling us that they would not be sealing our grout.
Fast forward to the holidays and when the baby caused $5000 worth of water damage to the house by flushing a roll of toilet paper. Yeah, I was really wishing I had sealed that grout once the flooding permanently stained it.
Luckily the insurance company paid for the restoration and the tile specialist introduced me to this awesome stuff called Grout Refresh. I decided this past week that it was time to tackle the boy’s bathrooms because as you can see above..little boy lack of, ummmm, aim, has made their tile pretty cringe-worthy!
Supplies
- Gloves
- Sponge
- Dish Soap and/or mild cleaner such as Soft Scrub
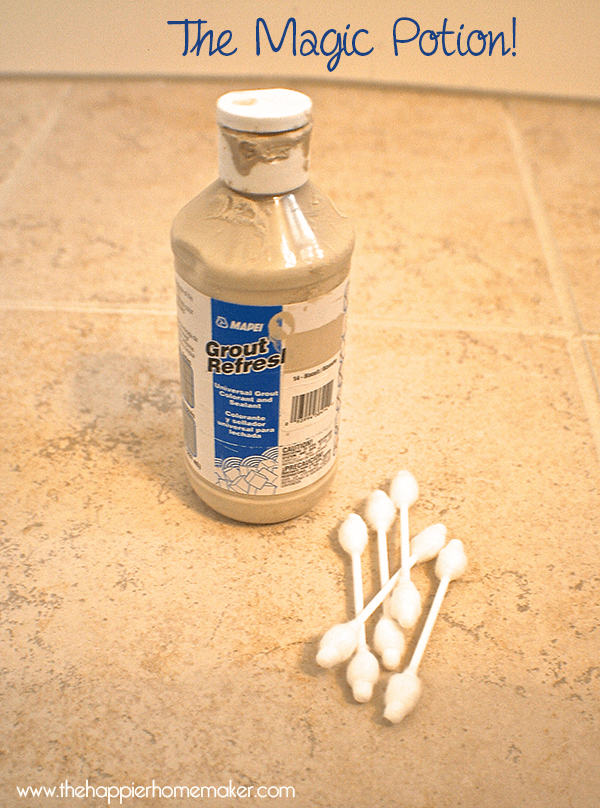
- Grout Refresh – I got my Grout Refresh for less than $15 and one bottle was more than enough to cover two standard full bathrooms.
- Toothbrush/utility brush/cotton swabs – I used Q-tips to apply my Grout Refresh but you can use a toothbrush or gloved hand just as easily.
Clean the Grout
It’s important to thoroughly clean the grout before you seal it so you don’t lock the yuck in!
- Mix dish soap and hot water and apply to the grout with a toothbrush. Let it sit 10-15 minutes.
- Brush the grout with a toothbrush and use a sponge and clean water to remove all of the soap mixture.
- If it doesn’t come clean consider a gentle cleaner like Soft Scrub.
Seal Grout
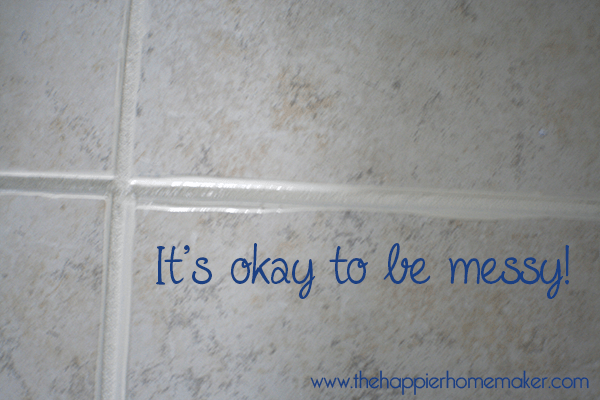
- Simply cover all the grout with the Grout Refresh-no need to be super neat-it won’t hurt to get it on the tile. The instructions tell you to wait 30-60 minutes after application and spritz with water. I can personally vouch that if you get busy with life and forget about it for, oh, 24 hours or so-that’s just fine!
- Spritz the grout with water and then wait five minutes.
- Scrub off the excess with a sponge. The Grout Refresh will easily clean off the tile while leaving the grout looking good-as-new! The actual labor time for each bathroom was less than an hour.
- Let the floors dry completely before walking on them.
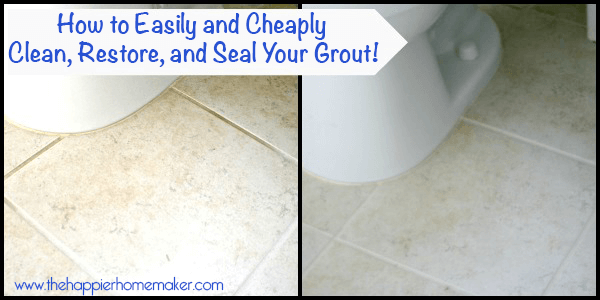
And here is the difference again:
Isn’t it a huge (and totally less cringe-worthy) result? I wish I would have done it as soon as we moved in but I had no idea it would be so easy and so inexpensive!
Tips for best results
- don’t rush, it can be tedious but it is worth it in the end
- wear gloves to protect your hands
- use a gardener’s knee pad or folded towel to protect your knees
- sealers don’t last forever, plan on resealing floor grout every 3-4 years, less for shower grout
Have you sealed your grout? Anybody else have the same “little boy” issues I do? Bleh!
Non-specific Low-down Fro this outcome
https://cialislevel.com generic cialis
Does the grout refresh come in colors that match the tile?
yes, there are a lot of different colors!
Do you need to seal the grout after
No Jen, the Grout Refresh seals it and colors it in one step
Hi, can you tell me the color please? I think we have the same tile and it has been hard to decide from online color swatches. Thank you!
It was called biscuit but I think they have since changed the color names.
I like your preliminary tip about cleaning the shower thoroughly prior to fixing any grout leaks. Hiring a professional repair service is a good way to ensure that your shower is fixed for a very long time. If I were to need such services, I would hire a company that could seal any grout leaks in no time.
I know this is an old post, but I would like to ask a question. Do you know if the grout needs to be completely dry before I start applying it? I am cleaning the floor with vinegar and baking soda now, should I let it dry overnight before I put the grout refresh on?
yes! dry it completely first after cleaning!
Grout is one of those things that we kind of let slide overtime. Before we realize it(at least me that is) it’s already turned a nasty brown color. Redoing the grout make any room look like it was just redone.
After trying numerous products to remove the tough stains and debris from the tiles, I was almost hopeless and planning to buy new tiles for our home. Just then, my friend suggested me to try the professional cleaning services for my tiles. After searching for weeks over the internet, I get to know about Clean Masters and after contacting them for the services, my tiles are as great as new and have retained their shine that was diminished with time. Personally, I find this company extremely reliable and efficient. I would love to recommend this company for all those who are looking to replace the tile due to their dullness. Try them to retain the shine of your tiles, you won’ be disappointed.
Hi Melissa,
You mentioned that 1 portion of 8 oz was good for 2 normal sized bathrooms.
Can I ask how large these bathrooms are? And how large were the tiles?
Because I am struggling to figure out how many we will need for our living room that is 700 square foot.
The bathrooms were about 4 by 8 feet with 12 inch tiles
This is really a tremendous article. You gave up here some information that is helpful for all. I came to know new ideas from this post that is helpful for cleaning. My bathroom tiles were losing its shine due to heavy heater usage, and the moisture was getting trapped making my tiles dirty and discolored. Hopefully your direction helping me about this. If you had more insight i will greatly appreciate it. Thanks for the providing these information.
A big thank you for your article.Much thanks again. Great.
EXCELLENT ARTICLES ABOUT HOW TO CLEAN, REFRESH, AND SEAL YOUR GROUT Best tile and grout cleaning company
Mark’s Tile and Grout cleaning Melbourne
Tile and Grout Cleaning Melbourne professional in tile cleaning, grout cleaning, tile sealing, and tile regrouting services in Melbourne! Call on 1300331708 for a similar day service.
Deluxe Tile Cleaning Melbourne guarantees to provide a quite effective same day tile and grout cleaning service that leaves your floors gleaming and sparkling. We now have the latest technology and first class equipment to completely strengthen your dirty tiles and grouts into something shining and absolutely clean! With well over 20 years of experience, we are among the leading names on the market.
I saw your video and read the article this product looks really promising and the before and after photos makes it even more promising. However, can you mention where can I get this product and what is the cost of it and how much application would be apt for use. This would be really helpful 🙂
nice information sharing
Yes, this product could work! Especially in small areas! Not to rain on your parade…I couldn’t image going grout line by grout line say 1000 square feet. If you go to Walmart and get a $1.29 bottle of Blue Dawn, microfiber padded mop, probably be faster and more effective…If you have large areas as mentioned, hire a professional tile and grout cleaning service and really say WOW! Best of Luck!
Hey there, I’m hoping you can help me out. My husband is wondering how long this will last before you have to redo? Thanks
We have since moved Michelle but the Grout Refresh was still looking beautiful when we sold the house four years later! ~Melissa
Your blog contains many good ideas. I came to know new ideas from this post. Keep posting new ideas. Thanks
This blog is having many new ideas that is helpful for cleaning. Thank you for this post.
Thank you for the article! I am constantly looking around the toilet for changes in color. I might try this on the bathroom tiles as well.
Around the toilet is from pee and cleaning chemicals…Acid-based! Discoloration is common and un-reversible! Best of luck!
My bathroom tiles were losing its shine due to heavy heater usage, and the moisture was getting trapped making my tiles dirty and discolored. Bought Grout Refresh at my locally and applied the same to clean my grout lines in the bathroom. Followed the directions on the bottle and after using the first time itself, I could see remarkable results.
Great informative article! I clean tile and grout for a living and use some of these tips! I love grout refresh. I also use oxygenated bleach to clean the tile and grout and it works wonders. Many homeowners use chemicals that destroy their floors and it is a very common problem