DIY Metal Roses
This post may contain affiliate links. If you purchase through links on our site, we may earn a commission.
I can’t tell you all how much fun I’m having being a #12MonthsofMartha blogger this year, it’s been so inspiring to get to test out the latest and greatest Martha Stewart Crafts materials each month.
This month I received an amazing package with lots of fun metal-working supplies! It was totally outside of my comfort zone but once I dug in and realized how similar working with metal sheets was to the papercrafting I used to love to do when my children were younger.
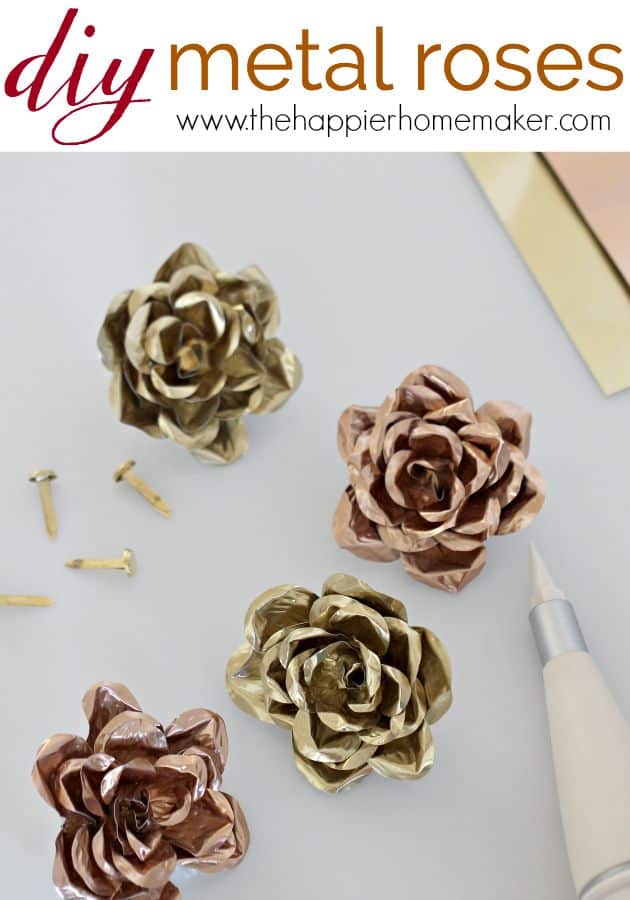
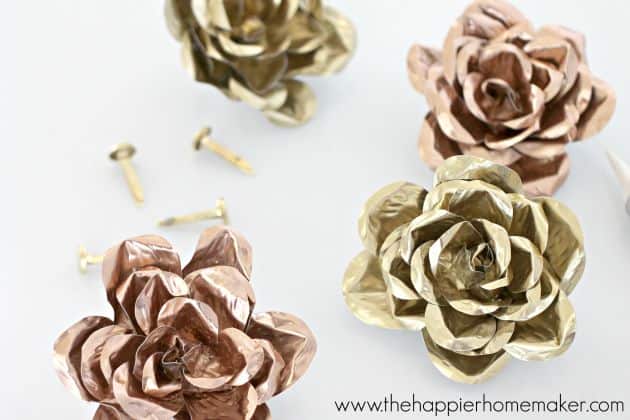
I was inspired to make these pretty little DIY metal roses and couldn’t be more excited about how beautiful they turned out!
This post contains affiliate links for the products I used-these links offer me a small commission and do not increase your cost at all. Thank you for your support of this blog!
Supplies:
- Metal Sheets
- Martha Stewart Crafts Metalworking Awl with Embossing tip
- Embossing pad (mine is from this kit)
- Scissors
- Brass Fasteners
- needle nose or jewelry pliers (optional)
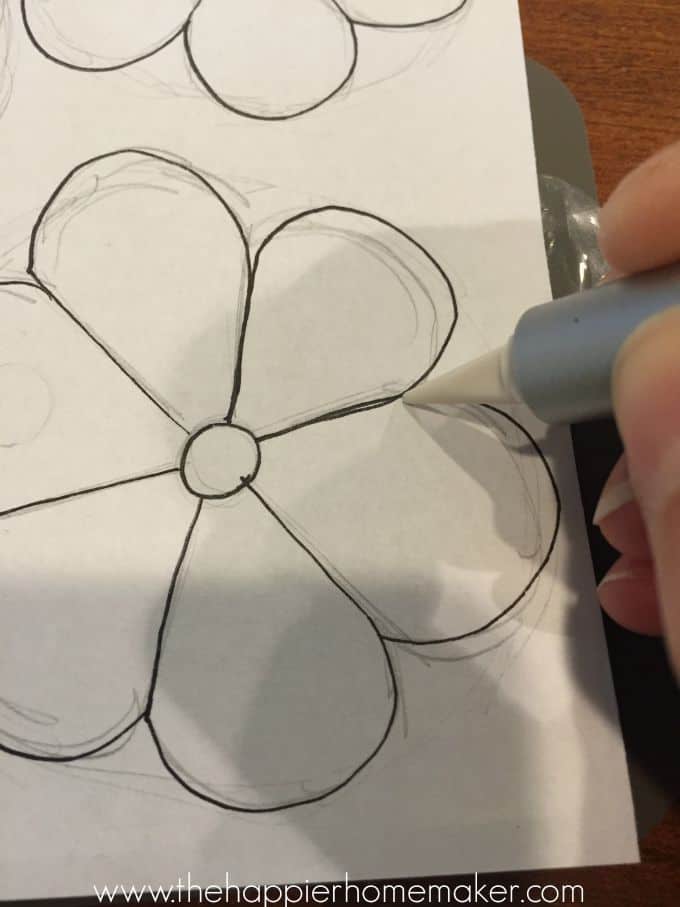
I started by drawing out some flower petal layers on a piece of paper. (I’m attaching a pdf of my drawing here in case you’d like to use it!)
I then traced the template onto my metal using the small embossing tool and embossing pad that come with the Martha Stewart Crafts Metalworking Tool Set.
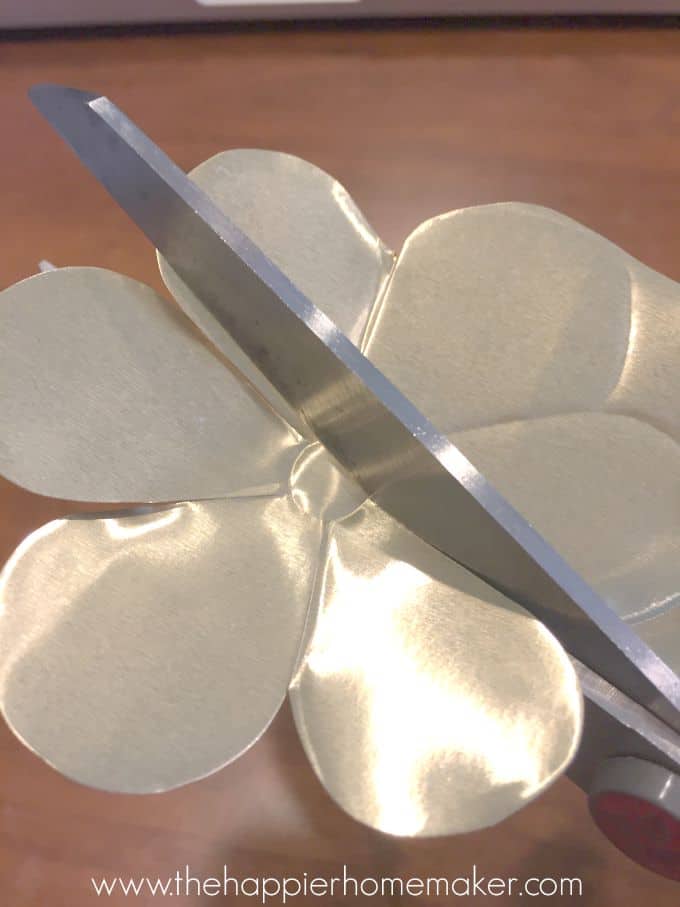
After all the templates were traced I carefully cut them out, being sure to leave each petal attached to the center circle.
Hint: Perfection is not necessary here, it’s a very forgiving craft!
After all the layers were cut I again use the small embossing tool and embossing mat again to add some texture to the petals. This makes the final flower look so much more realistic!

After all the petals were textured I stacked them up biggest to smallest and used the piercing tool to cut a hole in the center. I then carefully pushed a brass fastener through the hole to hold them all together.
Please forgive the video below showing how I bent each petal to give it a realistic shape-I asked my eight year old son to hold the camera for me and he apparently doesn’t have the steadiest of hands!
To fold the petals simply fold the tip of the petal in a v shape and then curve the entire petal towards the center just like real rose petals!
So there you have it! These are so easy even my 8 year old could make them once I showed him a quick example! My mind if brewing with ideas for these-perhaps a pretty garland….or embellishing a picture frame?
What would you use these pretty little DIY metal roses for?
I was provided crafts supplies as a #12MonthsofMarth blogger, all opinions and ideas are my own.


Do you make these roses to sell? What is the approximate size and do they come in a silver color also or only rose and yellow gold? Any more info would be appreciated. Thank you.
Hi there these are so dang cute I was actually wondering if you could give me an ideas of how to or what to use to harden these? I just saw a post of how to make draw pulls. And these would look beautiful on the furniture I’m painting in chalk paint for my daughter. Tyvm have a great day and keep up the great ideas and your hard work.
These would be amazing if you attached a hook on the back and used them as shower curtain holders! You could probably even find some way to make an entire bathroom decor set out of them- but defiantly for the shower curtain!
Love these!!!! I’m finding transfer leaf metal not actual transfer metal. Martha Stewart no longer sells it. Can you give us a link to some products that are conducive to what you used here? Thank you so much!
Here is a link to what I was using Stacie: https://amzn.to/2cYkBo2 I’ll update the post as well, thank you for letting me know the link wasn’t working! ~Melissa
Who ever put this on didn’t do a very good job of keeping the camera in place couldn’t see anything.
Love these! They are beautiful. I think they would make awesome Christmas ornaments! 🙂
Oh that’s a great idea! I’ll have to set these aside for the tree this year! Or a whole garland of them for the tree!
Wow, those are so pretty! I want to make some!!!
Those are beautiful
Thank you Janine!